• About
  • First time here?
  • Sitemap
  • Archives
  • Categories
  • Posts Tagged ‘niche hobbies’

    Hurrah for New Speakers!


    2015 - 05.02

    The culmination of my most recent loudspeaker construction project is finally here! The JB mk.IV’s are now complete. I spent a good amount of time listening and I’m feeling great about how they turned out. Some digression:

    On the enclosure: I would use Red Oak again, for sure. My nervousness for working with hardwood for the first time was totally misplaced. When cut with my circular saw, it was essentially the same as pine or any other softwood. Only with the router did I get burning of the surface and it was fairly easy to simply sand that away. If I did another pair like this, I’d probably pay extra to go to a lumberyard instead of Lowes though, since I suspect that some of the porosity I saw on the inside of my cuts wouldn’t be there with a higher quality of board. You can only expect so much from a big box store.

    2-in-1 polyurethane/stain; I would use that again. Wipe-on polyurethane was simply too thin though. That’s good for a final finish only but any sanding is going to take it straight back off again. As my final step I used a triple-thick polyurethane that worked well, although I notice that it did irritate my eyes for about 24 hours afterward, and that’s even with a fan blowing the vapors away from me in the garage. Maybe that stuff has to be used strictly outdoors. The end finish came out quite glossy as you can see in the pictures although it’s not a mirror finish since I did eventually reach the point of no longer caring about how perfect they looked, especially with the flaws already noted in my carpentry. I was too anxious to get to the listening!

    On the design: It’s a minimalist design, really. Two driver system with the simplest crossover possible: the -6dB/octave Butterworth filter, which uses only a single capacitor and a single inductor. That’s somewhat of a major feature on these speakers since nearly all popular designs opt for a Linkwitz-Riley filter with the steeper -12dB/octave rolloff that allows the tweeter to be crossed off lower and/or play louder. The values I selected for the components do leave a slight gap: the cap rolls off at 2.65kHz while the inductor rolls off at 2.55kHz.

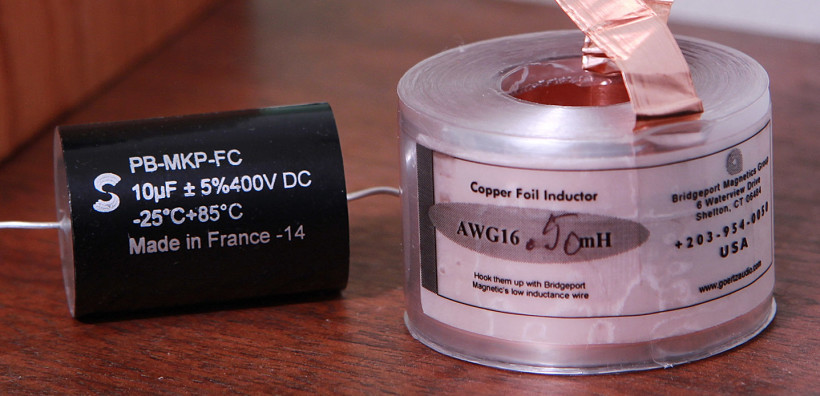
    crossover components

    With my mastering and EQing experience, I figured a slight dip at 2.6kHz would actually be pleasing to the ear anyway. The major advantage to the Butterworth filter is a linear phase response to the rolloff region–that is to say there will be no phase cancellation or comb filter effects around the crossover frequency, which all of the other crossover designs suffer from in varying severity. Judging by online reviews of the tweeter and its response curve, I should be able to get away with loud volumes at this crossover point since the resonance frequency of the tweeter is 1.1kHz. Both the tweeter and the woofer had very smooth response curves, so the expected character of the system should be quite neutral. As with my brothers speakers I knew right away I wanted to use an L-pad to compensate for the impedance and sensitivity mismatch between the woofer and the tweeter. The L-pad is a fun way to get a lot of different sonic flavors from a single system as well, since it’s essentially an extra tone control for your stereo system. Never again would I build a speaker without one.
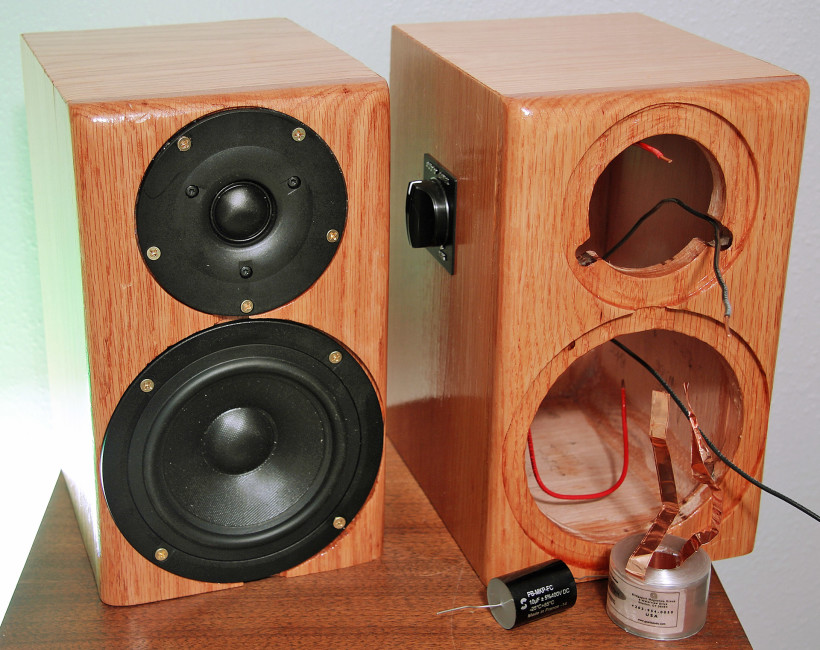
    L fully assembled, R in progress

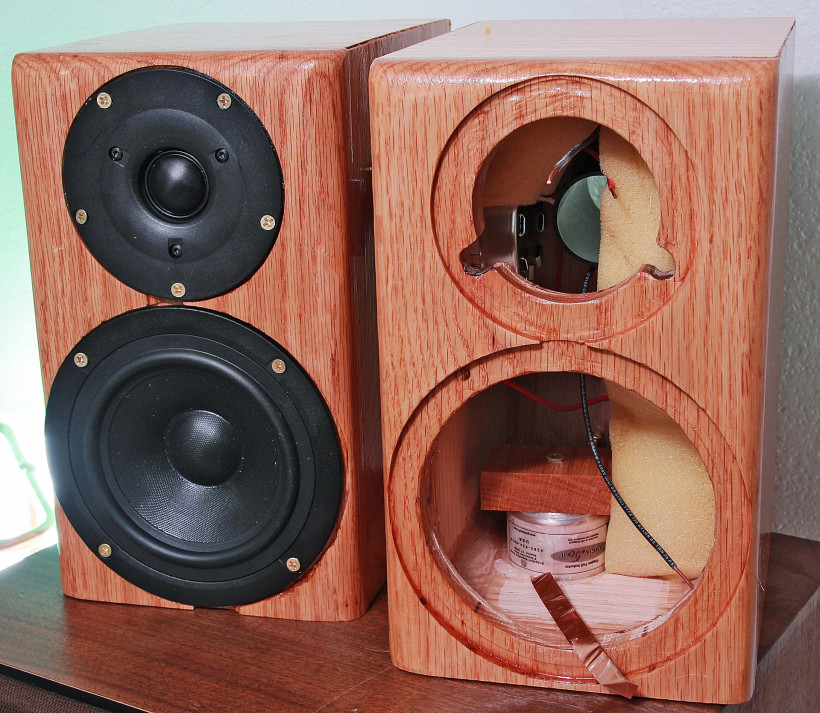
    For the crossover components, I did go a bit higher end since there’s only 4 total parts. German copper foil inductor for that precision midrange and a French polypropylene film cap for that snooty, refined treble. I did not even both mounting these to a PCB, instead screwing in a spare piece of wood to clamp down the heavy inductor, and a glob of silicone to secure the cap. Both are soldered directly to the inside lug of the + binding post to eliminate an extra set of connection points. The opposite end of the copper foil inductor was also attached directly to the woofer binding post, so it actually has no extra internal wiring on the + connection. For the rest of the wires I used 14 AWG solid copper wire that I also employ as the main bus wire on my railroad. It’s the same type of wire an electrician would use to wire light switches and outlets in a house, so very heavy duty. Totally overkill considering the stranded speaker wire which will probably be connecting these to any amp. It is somewhat difficult to work with though, since it’s stiff and fights against every bend. I’m 50/50 on whether I’d use it in another design.

    Philosophically, these units are quite different than the large speakers I built back in high school that are serving in my living room: those are 3-way with a dome mid, powerful low-reachingwoofer, and a complex computer-designed crossover that has like 40 elements in it. Since there are so many possible choices to make with speaker design it’s almost stupid to do the same thing twice but what can I say, I loved the tweeters from my brother’s green speakers so much that I had to use the same model again on these units since I missed their sound. Every speaker I’ve ever done has used cloth dome tweeters since I prefer their gentle timbre over a metal dome or a horn.

    crossover and foam installed, L-pad visible on the inside

    On the sound: I already knew that these tweeters were fantastic so they have been a joy to have back in my life again, so the ScanSpeak midwoofer is really the new player of intrigue for me here. Prior to building my brothers green speakers I had always wondered about the revered ScanSpeak brand and having been blown away by how good their tweets sounded I resolved to use a woofer of theirs as well on my own design.

    Initially my impression was neutral. The effect that a quality midwoofer has on the overall sound is more subtle, compared to the airy, delicate treble of fine tweeters.  Woofers typically do need a break-in period to loosen up and these seem like they needed that more than other drivers I have known… In my initial listening I did listen to “Spotlight” by SPC ECO and while experimenting with the tone controls on my Kenwood, I flipped on the 800Hz presence boost and immediately exclaimed “Oooh! Oh yeah!” after just a few moments of taking in the sound. Since the midwoofer is taking charge of everything from 2.55kHz and below, that’s definitely all his doing. I’ll need to spend some time breaking these in first, then listening to familiar material to give a true appraisal….

    As for the bass, it does not extend very low, but that was an intentional feature of the overall design. These speakers are intended to be paired with a subwoofer, not yet built. Knowing that, I purposely chose a midwoofer that had a high roll off and a good high end. Ideally I would have preferred a closed box but without making it a three-way design I could not find a driver that satisfied me. Everything that would go low enough in a closed box had a poor top-end response, either not reaching far enough or having too rough of a curve for my taste. Perhaps in the future I may experiment with drivers that do have coarse resonances and choppy curves. Like I did mention before, some dips in the response curve can sound pleasing in the right spots.

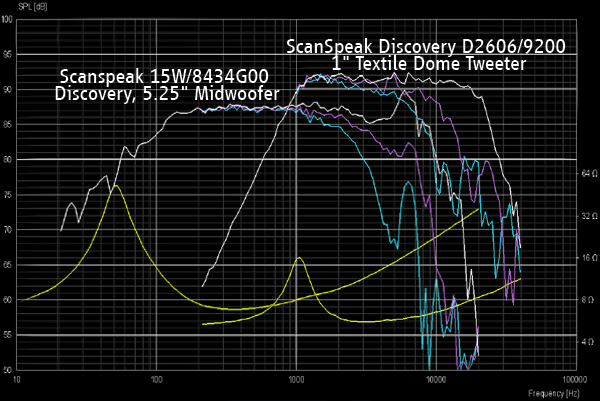
    response plots JB mk4 both drivers black

    I have superimposed the response/impedance plots of both drivers here; the plot is remarkably smooth for both drivers and with a 1.5×4″ port, an F3 of 80Hz is achievable with this woofer according to the Madisound website. Final enclosure volume is 4.5 liters or 0.16 cubic feet which is fairly small. The intended volume was 4 liters for the port design, but it’s good to go slightly over for internal bracing, components and stuffing; factoring those variables in, we’re probably beneath 4 liters again, but I have read that stuffing makes a box “look” bigger to a woofer. Another point of compromise was the ratio of sizes between front/top/sides. Ideally I would use 1.618, the fabled golden ratio. However the size of the driver faceplates dictated that wasn’t going to be possible, so I ended up with 1.3 and 1.9 instead.

    One other thing I did was to router off a smooth rounded edge on all sides of the front to reduce diffraction of the high end. The tweeter faceplace comes right up to the edge of the front panel though, so a harsh edge was unavoidable there. Curiously, I like the way the treble sounds when standing slightly above the axis of the tweeter so maybe a certain amount of diffraction is good sometimes? Or that could just be the overall directional response of both drivers that I’m hearing or something else entirely, who knows.

    More for my own later reference down the line than anything else, here is a breakdown of the parts:

    10uF Solen PB10 mfd Metalized Polypropylene film fast cap
    0.50mH Goertz CF.5 (16AWG) copper foil inductor
    ScanSpeak discovery D2606/9200 1″ textile dome tweeter
    ScanSpeak discovery 15W/8434G00 5.25″ midwoofer
    Yung 100W 8ohm L-pad
    Goldwood 1.5×4″ flared port
    Lowes Red Oak panel x2, 7.25″ wide
    Generic gold binding posts

    And some further reports as my listening extends into the weeks:

     Moving these speakers from my Kenwood receiver over to my Marantz PM750DC yielded a major difference in the sound.  Maybe it’s a combination of the room and the speaker placement but they have a new life to them near the railroad now.

     Basslines on Donny Hathaway’s rendition of “What’s Going On” come out clear and defined from my Marantz 6100 turntable.  I underestimated the capabilities of these midwoofers on their low end.  Happily thus far I haven’t heard a tune that exposes any bloated notes on basslines.  That’s always a pet peeve for me.  These speakers will really shine with a sub, afterall that’s how they are meant to be paired.  But until that’s built I can be content with what’s here.

     A whole new amount of depth and life appeared on Royksopp’s “Senior” album, one I have not listened to on a great set of speakers intently.

     Found a few new details in familiar recordings: you can hear the snare rattle as the toms are played at the beginning of Steve Miller Band’s “Fly Like an Eagle”.  And there is some kind of percussion instrument I never noticed before despite listening to Seal’s “Dreaming in Metaphors” hundreds of times–a song I used to be all about in high school.

     Something totally unexpected: I often listen with an extra compressor plugin “juicing up” anything being played over the PC, but who knew–with these new speakers I find myself turning the compressor off more and more, just listening to the original audio exactly as it was.  Compressors can often bring out extra details but jeez, these speakers are exposing how a wide dynamic range actually sounds better than a totally squashed signal that has all information crunched into a narrow volume range.  That’s a beautiful realization I did not anticipate.

     Getting a new pair of speakers sure is a great excuse to go back and listen to familiar music you may have listened to over and over at one point in your life…. which takes it all back to what this whole pursuit is really about
    Tycho Monitors, phase two


    2015 - 03.08

    So I’ve been slowly progressing on the small bookshelf speakers that I’ve been building.  Here are a few progress pictures 1. after the front/back panels were routed and glued on and 2. after staining.

    Tycho Mons assembled

    Tycho Mons stained

    Tycho Monitors, phase one


    2015 - 02.05

    As alluded to long ago in 2014, I bought some Scan-Speak drivers and associated hardware needed create a pair of hi-fi bookshelf speakers. I am just now finally getting around to building the enclosures for these guys. A few build photos are probably in order.

    Tycho Monitors in progress

    craftsmanship level = MEH.Everytime I build a new set of speakers (which doesn’t happen too often) I try out some new philosophies and these are no exception. Instead of solid MDF, this time I went with Red Oak. I’m not sure this wood is as great as it could be in terms of quality–I got it at Home Depot and if I were to do it again, I think I’d spend the extra to go get it from a legit lumberyard.

    This time I’ve also attempted to join each side with a 45 degree joint, which I don’t think I’d try again.  As you can see in the photo above, I used the 45 cuts as joiners on the inside as well.  Maybe I’m lacking the right tools to really pull this off. I did take probably a half hour or so playing around and dialing in my tracksaw to cut what I thought was a perfect 45 degree angle. I measured it with a level, protractor, and used two pieces pressed together with a carpenter’s square to verify they joined perfectly. Which they did, and yet, when I put the boxes together there is a thin line of open space around almost all sides, which I found equal parts surprising and disappointing. Somewhere in the process there was some looseness that prevented everything from lining up perfectly despite the fact that I took great care and worked slowly. Like I said, maybe a circular saw and track just can’t achieve perfection here.

    In any event, I’m forging onward and going to router out holes for the drivers next. Then there will be some variety of staining and/or lacquering before they’re ready to be used for real. Delayed gratification……

    Great things have small beginnings


    2014 - 10.18

    So since I gave the green speakers to my brother, I’ve really been missing the sonic sweetness of their tweeter, the ScanSpeak D2606.  It’s part of their discovery series line, which aims to set some aggressively low price points for ScanSpeak drivers which are typically audiophile-expensive.  Pretty big deal to me then, that I’ve decided to construct a new set of speakers using the same tweet, paired with a 5.25″ Midwoofer also from the ScanSpeak discovery series.  It’ll be a small-sized bookshelf with an f3 of around 80Hz.  Not impressive in terms of bass extension but these will be paired with a powered sub eventually and 90Hz or so is a good range for the low end to be taken over by a fat power amp.  More details on this project as I progress.  This post is the genesis…

    ScanSpeak D2606 & 15W/8434G00

    Reason Synchronous Video Tutorial


    2014 - 06.18

    I made this video so I may as well post it here… it’s a video tutorial on using the Propellerhead Rack Extension “Synchronous” in Reason 7.1 to make glitch percussion.  If you know what some or most of that sentence means, definitely check this out:


    I also made a shorter version, since this video was created for a contest, and (naturally) AFTER I made the above one, I figured out there was a 5 minute time restriction.  The short version is here.


    You Might Be Preferred 45 Cool. But You’ll Never Be Xtra-Repaint Ghosted Preferred 45 Cool.


    2013 - 07.17

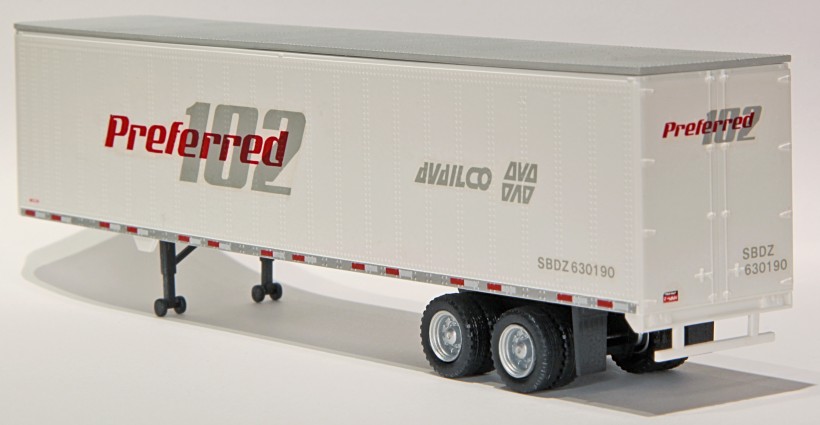
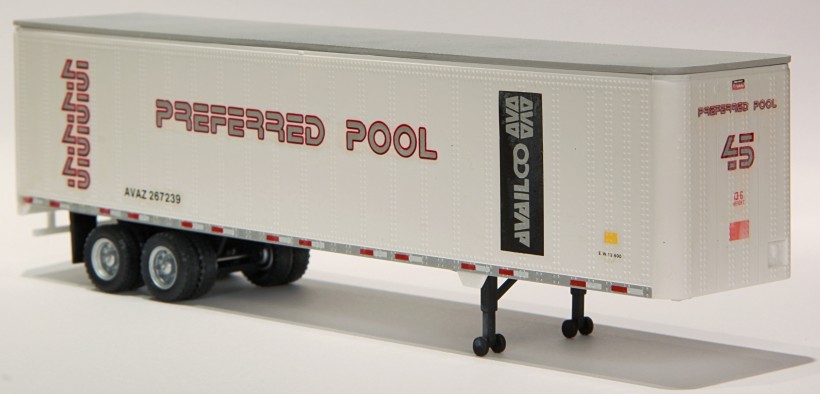
    It’s been a while since I did a model train post. One thing I’ve been working on lately is a set of blank 45 foot trailers which I’ve been decaling for the Milwaukee Road’s trailer service. They have a number of neat paint schemes which had caught my eye, namely the “Preferred 45”, “Preferred 102”, and “Preferred Pool” trailers. One of each is on display here:


    The decals are by Micro Scale and although they have been out of production for probably 10 years, you can still find them floating around (pun intended?). Old decals can be tough to work with, since they like to fall apart on you, but with some patience I think I nailed it. The trailers are also out of production models, from the Promotex line by a Canadian company called Herpa. I went with these simply because I liked the amount of detail on them. The reflective stripes on the sides are probably an anachronism, but eh, whatever, I think it looks neat so let’s run with it.

    It was actually really tough to find reference photos taken of the prototype (aka the real thing for the non-modelers out there). Below are two which were shared with me from the slide collection of Mr Nathan Dahms. Thank you for these helpful images Nathan!  And thank you for permission to post them here so that others in search of reference images will have something to use :


    I got this first image after decaling mine.  Although I followed the decal sheet instructions (which are consistent with the image below), this trailer is a bit different.  I think for the next ones I do, I will mimic this photo instead…

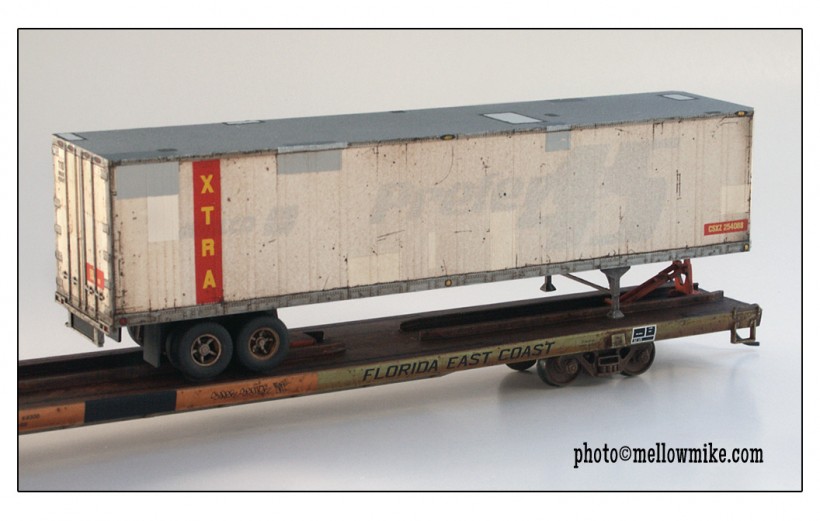
    And lastly, in the process of searching for images, I rediscovered this dude who goes by the handle Mellow Mike. I had seen his stuff on weathering forums years and years ago, then lost track of what he was up to when those forums closed. This guy is seriously god-like with an airbrush (and whatever other secret alchemy sauces he uses). If this kind of thing interests you, his website will totally blow your mind. Anyway I randomly found a trailer he had done via google image search. It’s a Milwaukee Road Preferred 45 trailer which was sold and painted over, although the original scheme remains faintly visible, a state referred to as ‘ghosted’. He said he based this off a photo. So my little decaling project is neat and all, but check out the real master at work:

    JUST.  WOW.

    Green Meanie: The 12″/500W Sealed Box


    2013 - 05.31

    So previously I chronicled the construction of a set of hefty bookshelf speakers I built for my brother. They’ve got a new buddy: a 12″, 500 watt subwoofer, in matching green paint! I haven’t written about the process of building this guy near as much because the cabinetry was essentially the same process: cut up MDF, router in the driver openings, glue’n’screw together, router off hard edges, silicone seal all joining surfaces on the inside, primer paint the outside, 4 coats of green paint, and then coat the whole shebang in Enviro Tex for a piano finish.

    This time around I used a thicker, globbier primer called “gripper” in the hopes that it would more aggressively adhere to the MDF. When I put it on, it seemed like oh yeah, this stuff is gonna bond. But sure enough: I set the wet surface down on a few triangular wood blocks to dry, then each of them lifted off a small bit of the paint when dried. Seems like nothing can actually adhere itself to MDF, it just covers it. That’s going to be okay though, since the Enviro Tex finish is very thick and will seal any loose imperfections underneath.

    This is only my second attempt at building a sub. The first one I built for a roommate in college. It used two Peerless XLS extra long excursion drivers, one active and one passive. Using a passive radiator extends the frequency response and lets you get some serious low frequency. The downside is that since the passive driver is, by definition, uncontrolled by a magnet, it’s free to vibrate however it wants. That will muddy up the sound. That sub was definitely LOUD as hell, and low too. We would bump that thing in the dorms and I’ll be damned if you couldn’t hear it on the other side of the building, 3 floors away. And we’re talking about a cinder-block building too!! So that thing was an outrageous amount of firepower for it’s size, which I would credit to the low frequency extension of the passive radiator. But it could never be described as tight, quick, responsive, or accurate.

    As my second attempt, I picked out a driver that could be used in a sealed box, to go for power and accuracy in the audible range. The lowest of the lows are really cool, for sure, but subs with very low frequency output are almost impractical in a sense: that low, low range is going to penetrate ANYTHING, as the cinder block dorm proved in college. You’re going to be irritating anyone within a thousand foot radius when you rock out, no if’s about it. This time around I wanted power in the range of human hearing. Yeah, that’s still going to punch through plenty of walls, but not on the level that <30Hz will.

    I went for a 12″ as a compromise between tightness/control and low frequency extension in a sealed box. The lowest audible frequency, referred to as “f3″, should be somewhere in the high 30s. The driver is a Dayton Reference Series 12” model “RSS315HO-44″ with 4ohm impedance. It’s a dual voice coil driver, although I’ll only be powering one. The T/S parameters of this thing call for a one cubic foot sealed box for its optimum response, which is fairly small for a sub. This would be a superb driver for a car sub, where more amps would be geared toward handling that brutal 2ohm impedance you’d get by wiring the dual voice coils in parallel.

    Supplying the power, we’ve got a 500 watt amp made by Yung International, with a +6dB boost at 25Hz. I went for the 6dB boosted model as opposed to the normal model, with aim of pushing the f3 out a little lower than the driver would normally achieve. Why not use that EQ to my advantage!

    First impressions?  Punchy-est 12” in recent memory!  It’s bass drum hits are concise.  Basslines are even, with no ‘bloated’ notes that pop out louder than the rest.  And the lowest audible pitch notes are there.  The tune “To Feel Good” in the music section is a great test of super low bass, since we used a sine wave bassline at -1 octave to the main bassline synth you hear.  That makes for some low, deep notes!

    Really digging this puppy so far.  Gonna be a hell of a sound system for this fall….

    The Plastic Fan Appreciation Society Strikes Back! – aka “In Which I Almost Win The 2012 Nobel Prize In Rhyming But Get Disqualified For Taiwanese Mispronunciation”


    2012 - 08.07

    So feast yo eyes on this, fellow fan enthusiasts: The Kuo Horng 12″ oscillating desk fan, in the most arresting color scheme of green & grey:

    Them Hardcore Metal Fan Loverz are gonna hate, but I think this fan is totally radish. Ahh. It’s like a metaphorical cool breeze for my eyes and then like an actual real-life cool breeze for my airhairs. Because actual real-life cool breezes sometimes don’t feel so good on your eyeballs so that’s why I had to clarify by saying it that way.

    I’m going to call her GG for green & grey, since I don’t actually know how to pronounce “Horng”. (woah, holy shit you guys, I think I might have just discovered a word that rhymes with “Orange”!! …Wait, no, that can’t be how you say it, false alarm.) I think this might be my new favorite fan, at least stylistically. Functionally, my Dayton 12″ at the office is the MVP. That guy has some serious responsibilties, keeping me cool throughout the 9-5 workday, particularly when there is a garage door nearby which is frequently left open to the searing Texas summer heat. It’s also astonishingly quiet too, which is great for a fan that you have to sit and listen to all day long. A loud fan can make you feel like you’re getting yelled at, my girlfriend tells me. Something the Dayton made me realize though, is that 12″ is really the ideal size for a desk fan.

    I’ve got a XL-sized 16″ Galaxy which works the night-shift in the bedroom, keeping me and my lady cool as we snooze. And man, that thing’s got some oomph–no joke! I think I can count the times over the last year that I’ve had it on medium speed on one hand. (And no, I will not be providing an explanation for why such excessive fan power was required on those occasions. Use your imagination. Or scratch that, maybe don’t.) A 16″ fan is really only necessary for someplace where you need airflow that would compete with a strong box fan, like in a garage or a workshop. Or maybe the Galaxy is just that much of a badass? In any event, I think I’ve solved the cosmic riddle, that 12″ is just the right balance between noise, size, and power.

    Through my previous post(s) about the dangers and/or the awesomeness of fan collecting, I was made aware of the svelte stylings of the Taiwan-based plastic fan manufacturer Kuo Horng. Their simple retro designs with hip’n’with-it looking speed controls caught my eye. Those monochrome lines in various colors have a retro-fetishizing sheen to them that appeals to me somehow. It’s like something from the 70s that never went out of style.

    And of course it goes without saying that any fan that uses piano keys for speed control is automatically super sweet. Or as the kids like to say, über diggity-dank. Every time I press them, either in the office or at home, I just enjoy the simple act of setting the motor to a different speed. The click of the mechanism as it responds to your finger, the snap of the adjacent key popping back up again, all subtly reminiscent of an old-school tape recorder from your childhood–it’s an intrinsically satisfying thing. Sometimes I reach back and change the speed of the fan just for the sake of pressing the keys. (Really!) Maybe it’s some odd type of nostalgia or the plain enjoyment of something mechanical in these days of capacitive touchscreens and digital everything.

    So GG is sort of taking over main fan duty in the computer/model train room. There’s a ceiling fan in there, which is pretty effective, but it’s also somewhat noisy, so I find myself opting for the oscillating fan instead, especially when I’m playing records. That, and I also find the oscillation refreshing, the way it hits you with a breeze which goes away for a moment and then returns, over and over. GG does make some quiet grinding and whirring when you first fire her up, but after maybe 5-10 minutes she gets into the groove and purrs along pretty much silently. I also have some downward angle going right now, which is probably partially accountable for the rougher startup. In my experience it seems like oscillating fans tend to prefer moving on a level axis, rather than aiming up or down where they start making more odd noises.

    In any event, this fan is a welcome addition to my arsenal (see how I avoided calling it a collection there?) and totally an enabler in my dedication to living the ‘cool’ lifestyle here in hot Texas. It’s not a household appliance people, it’s a way of life. (Troof.) I will admit that I do sort of wish the blade itself was a nice translucent green, the same way my Dayton and Galaxy have transparent blue blades. A nice “kelly” green too, not a lime or a forest green. So maybe my quest for the ruthlessly, absolutely perfect oscillating desk fan isn’t fully complete yet, but I will say the main chassis on GG is, for my twenty-eight buckaroos including shipping (take that you metal fiends) about as cool as it gets. I think if I were able to find a green blader and swap them out, we might have such a dense singularity of plastic fan stylishness that it might have, in the words of the G-Man, ‘unforseen consequnces’….

    Count it!

    And on the fans taaaaag, JB OUT!

    I have a Model Railroad! And have been reminded: This is a PROCESS.


    2012 - 06.24

    Okay, so ultra-huge “The Moment of Genesis” tag here: model railroad construction has begun! Last week I started building benchwork, and this last weekend I went out and got plywood, cut it up, put it together, and just last night, finished a bare-bones loop. That one sentence right there is a TON of work. Although it’s not much to brag about at this point, have a look at the progress thus far:

    For benchwork, I used plain old pine 2x4s and bought a gigantic box of 3″ tan-colored screws that will blend in with the wood. Seems like it worked out great so far. With the track plan I have in mind, the layer that’s been put down right now will eventually be almost entirely unseen, serving as a reversing loop on one end and hidden staging yards on the other. I established the height of the layout based upon where I visually estimated the height of the next layer to be. My thinking was to make the 2nd level (which is the visible level where all the action will happen) eye level when sitting in a chair. Already I’m wondering if I didn’t set the first level too low. It’s 30″ above the floor, which is exactly eye level if you’re sitting (straight-upright) on the floor. Raising the height of the whole layout might happen in the future, however I need to build the second layer before I’ll know if that’s a good idea or not. To be continued, many months from now…

    For my main construction material, I decided to use plywood instead of MDF (medium density fiberboard). MDF doesn’t warp, is quite sturdy, and absorbs sound better; however it’s also heavy… and when you cut MDF it generates a literal cloud of superfine sawdust. Sawdust that contains formaldahyde, a carcinogen, which will settle everywhere, over everything. I know this because I made the mistake of cutting MDF indoors when I was in high school, and afterwards I was finding dust from it for years. MDF definitely has major advantage in terms of planarity and acoustics, but I knew that I would need to make many cuts to the railroad boards in situ, and that superfine sawdust was a major no-no for a room that can’t be sealed off from the rest of the house. That, and MDF will totally eat sawblades like candy, and I plan to use my jigsaw to cut curves and special shapes. Plywood, despite the downside of warpage, will have to work. At least at $16 per 4’x8′ sheet, plywood is also cheap!

    I’ve been asking myself the question, “how am I going to build this layout so that it can disassemble in the future?” The solution I came up with was to use plywood sheets as a base that will attach to the benchwork. Any risers, subroadbed, and extra layers above will attach to the plywood sheets, rather than attaching directly to the benchwork. Any screws which attach the benchwork to the plywood base will come in through the bottom, so that by unscrewing those, I can lift off the layout in sections for removal. I won’t learn if this was a smart idea or not until I start building extra layers. Hopefully the answer will be yes. I suppose that all hinges on how securely I attach everything to the plywood base.

    On Saturday I pushed hard for most of the day and completed essentially all of the round one woodworking. I was really hoping to throw on some track and get a train running before bedtime, but then I went to search for my track spikes and they were… absolutely nowhere to be found. I tore open every box and looked twice. Nothing! No spikes, only exasperation! So Sunday I visited a local hobby shop and picked up what I needed. When we got home and I started working on the track I was reminded of a few rules of model railroad construction that I had completely forgotten about:

    1. for every track spike that goes in nice and easy, there are 5 that instantly get bent up in 7 directions and are totally useless. Somehow you delude yourself into thinking “hey, I can still save this, I can make it work!”
    2. old flex track loves to destroy itself if you try to force it into a curve while partially nailed down or constrained; the plastic ties snap off and you’re left with a broken section that has to be cut away
    3. anytime you cut a piece of rail, it will fly across the entire house, ricocheting off every wall and landing who knows where
    4. soldering a stretch of flex track together while straight, and then attempting to bend it into a curve later is a bad idea (see #2)
    5. brand new rail joiners are, like, impossible to get on. Anticipate raw thumbs.

    Alright, so now that I’ve remembered those rules, maybe life will be easier going forward. I got my loop built and broke out my awesome new MTH Bipolars for a victory lap! It was at this point that, as the title of the post says, it occured to me that there is no single moment of triumph, because a well-running railroad doesn’t just magically happen. It’s a process to get there. I could get the Bipolar to run around a couple times without derailing, but the trackwork, even with its very wide curves, had minor imperfections–and minor imperfections in 1:57 scale are actually not just minor imperfections. Track is FUSSY. For Serious.

    I got out the Hiawatha and attempted to run that, and got another rude awakening: A single bipolar can pull only about 7-8 cars around a 24″ radius curve. And this is on level ground, nevermind all the hills I’m about to introduce. Super Dome derailments started happening where nothing else came off. Okay, time to add a rerailer–I don’t know how I thought I could get away without one of those in the first place! Fixed the one problem spot… found a new problem spot. Then I started getting uncouplings due to track passing over two adjoining sections of plywood which weren’t exactly matched in height. Ahhhh, it’s all coming back to me now, the trials and tribulations of fine-tuning and troubleshooting the tracks!

    The track problems are not such a big deal. Every layout will need to overcome those. And of major responsibilty for this is the fact that I was rushing to get it built, rather than taking my time and being mindful to create smooth, perfect joinings between sections. I should know better than that. So those problems can all be replaced, reworked, and overcome. But I’m a bit more concerned about the Bipolar’s inability to pull much on level track. If I double-head them, that’ll increase the power but I’m not sure by how much. There are a few other options such as adding lead weights to increase locomotive traction, and a product called Bullfrog Snot (seriously), which adds grip to the wheels. But if it turns out that even two Bipolars can’t haul a 9-10 car train up the grades & curves I’m planning, well, that’s a real bummer. Time will tell.

    Also somewhat of another setback, the E1 with the cool paint scheme seems to have some kind of issue. It runs sort of jerky. Going to have to look into that. I’m sure it can be fixed, but just another thing to take care of before I can relax and enjoy the empire as I have dreamed it… Well, this is step #0001 I suppose. There’s a whole lot more to do!!

    Playing the Mario banner


    2012 - 04.09

    So as some of you may have noticed, there’s a new banner which randomly appears on the desktop version of this site with a mario theme. I built it using the level editor in Super Mario X, and oh man, it’s actually really hard. Have a look at the below video of me dying once, then trying again and beating it. What you don’t see are the 10 takes before this one where I screwed up and died repeatedly. SHEESH!